Static User Display and Navigation
Static users, remember, are a type of user whose function is as a means to display the daily appointments for a scheduling area: Consider, for example, a unit, ward, or domain. And think of the monitor as an electronic whiteboard. When you log in to WellSky Resource Manager at a workstation used as static user, you will immediately note a number of layout and feature availability differences between the static user and a normal end user, as illustrated in the following screen shot.

- The Demographics panel is not part of the static grid: You cannot select patients as a static user.
- The grid always displays appointments for Today's date, so the Calendar is not included.
- A refresh counter appears to the right of the date in the banner and cycles every 45 seconds for updates elsewhere in the organization.
- Recall that the horizontal yellow line bisecting the grid indicates the current time.
- Patient and resource columns that contain double-booked appointments automatically appear expanded. You do not have to click the column headers to expand the column when logged in as a static user. See the Resource Threshold View for a related discussion.
Assign Patients and Resources to Columns
Assign patients and resources to scheduling columns as you would normally. The following reviews resource assignment. Substitute patient for resource as needed.
- Right-click over the desired column header.
- Select Assign > Assign Resource from the pop-up menu.
- Select the appropriate domain and resource type, and then select the desired resource.
The Global Right Can Change Column Grids must be set to Full on the user definition.
User Preferences
The Preference options for static users are generally the same as for normal users; however, the General Options and the Workflow Preferences options are not available. The Global Right User Preferences must be set to Full on the user definition in order to make changes in Preferences.
- While in Preferences, note that a Grid option has been added between Preferences and Log Off. Click this option once to navigate back to the grid (e.g., to forego making changes to your settings).
See the User Preferences Overview and the subsequent topics outlined there for a discussion of the features.
Appointment Management
You basically have two options in regard to appointment management from a static grid:
- You can pin the patient to a patient column.
- You can adjust the treatment time.
Pin a Patient
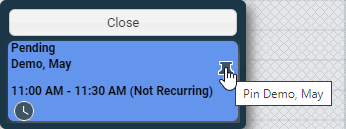
- Right-click over the desired patient's appointment. A pop-up menu similar to the following will appear.
- Click the red pin icon. The grid will refresh with the pinned column. Note that pinned columns always appear to the right of any preexisting pinned columns.

See Pinning a Patient to the Grid for a more general discussion.
Adjust the Treatment Time of an Appointment
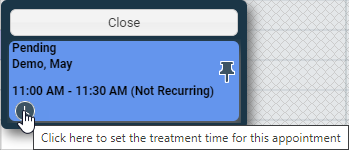
- Right-click over the desired patient's appointment. A pop-up menu similar to the following will appear.
- Click the pocket watch icon. A data entry field will appear.
- Enter the actual treatment time for the appointment.


Security Profile Right: Appointment Rights > Change Appointment Status > Edit Treatment Time must be set to Full in your security profile to use this feature.
See either the Treatment Time or Used Time Column topics for a more general discussion. Note especially the Key Considerations.
Double-booked Appointment Display
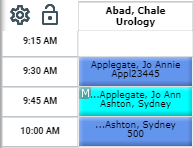
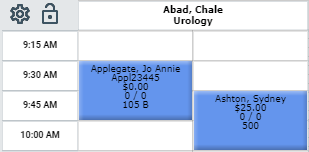
Resource columns are automatically expanded when logged in as a static users: that is, those users that are configured to display schedules for a unit or ward always expand columns for resources who have double-booked appointments without user intervention. Consider the following examples.


The first image illustrates how a typical user routinely sees double-booked appointments. The second image illustrates the default static user display.
Key Considerations
- Generally static users are at workstation in fairly public areas, so care should be given to adhere to HIPAA requirements.
- When logged in as a static user, you cannot move/copy/delete appointments or manage the status of appointments.
- In that the general intention for a static user is to display the daily schedule of an area, you will need to configure your display fields appropriately to adhere your HIPAA policies.
